June 29, 2020
Establishing a Good, Portable Development Environment
As programmers, we all have a desire to be lazy. After all, that is why we write programs in the first place: to get our computers to work for us. Therefore, it is only natural that we should also be setting up our computers to help us with the more mundane parts of coding. This is where a development environment comes in.
One choice that beginner programmers often gravitate toward is the Integrated Development Environment (IDE), where one writes, builds, tests, debugs, commits, deploys code all in a single piece of software. Examples of this include IntelliJ and Eclipse for Java, PyCharm for Python, and Visual Studio for C and C++. While these tools are certainly powerful and useful, especially for developing applications that are tailored to specific platforms (development of Android applications would be greatly hindered if one were not to use Android Studio, a spin-off of IntelliJ specifically designed for Android development), they are also somewhat problematic in that they force you into using their predefined workflow. Often, this makes the coding environment highly non-portable; if you create a project in one IDE, you, as well as anyone you are working with and anyone who will have to work on this at a later date, might find it increasingly more difficult to move off of that IDE as the project grows. This is, of course, more than a little annoying.
Below, I will share with you a few methods that I use in establishing my development environments using mostly portable and preexisting tools.
Using Command-line Package Managers
Many modern programmming languages, such as Python and Javascript, depend on a vast ecosystem of freely available open-source packages or modules. Often, projects in these langauges consist of piecing together different packages, along with a bit of ingenuity from the programmer, to create something novel (think hackathons). While IDEs can typically download and install packages for you, they tend to do so in an opaque way. It is much clearer, probably to you personally but certainly to your collaborators, if you have any, if you use list out your dependencies explicitly. I will go into two examples of command-line package managers here, pip and npm, but most package managers for modern langauges should behave similarly.
For developers working in Python, the pip tool is the main method for acquiring dependencies. To install a new package, one would simply type pip install <package-name>, and pip will install the package into your local python environment (which is hopefully a virtual environment that you have previously set up!). However, pip also has an additional feature that allows one to specify a file (typically called requirements.txt) which lists out package names one per line, and pip will install all of the enumerated packages. This feature can be invoked using the -r flag, as in pip install -r requirements.txt. Therefore, what one could do is simply maintain a list of all of the dependencies of the project in this file and commit it to the code repository so that anyone else who would pick up this project in the future can get their own Python environments up to speed by simply running pip install -r requirements.txt. I highly encourage anyone who is developing in Python to include such a requirements file.
For developers working in Javascript, life gets even easier. As it turns out, npm is vastly more powerful than pip. With npm, one can first create a local environment using npm init, which creates a package.json file in the local directory. Any subsequent installations done via npm will be kept track of in the package.json file automatically. To replicate a development environment, simply run npm install in the same directory as the package.json file.
The main difference between package managers like pip and npm and IDEs is that these package managers are highly portable. One can easily install pip or npm on virtually any computer. For Unix-based operating systems, it can be as easy as a single command in the terminal (sudo apt-get install pip, sudo apt-get install npm for Ubuntu).
Using make
Created by Stuart Feldman in 1977, the make command-line tool was originally designed to simplify the build process for large C projects by introducing partial compilation, where only files that were changed would be rebuilt. It was revolutionary at the time and still widely popular today, and as such, it is usually preinstalled on Unix-based operating systems. While popular modern languages like Python and Javascript do not need to be compiled, developers can nevertheless still take advantage of make in their workflows. One key feature of make that makes it extremely, even nowadays, is phony targets, i.e., targets for building that do not correspond to physical files. Traditionally, phony targets, such as all, were used to build multiple physical targets at once (i.e. if a project consists of three executable files, then a single make all command could be used to build all three).
However, as it turns out, since make is general enough, one can use make with phony targets to essentially run arbitrary code, which makes it useful in a variety of sitautions. One way in which I use make in my personal projects is to start a local server to serve a web application for testing and debugging. Another way in which I use make is to set up automated compilation in the background. Many build tools, particularly those that can be installed via npm, come with a --watch flag that will "watch" source files for changes and rebuild files upon detecting a change. These commands can be placed into a Makefile under a phony target, say, watch, so that they can be easily invoked in the future via a simple make watch.
Using tmux
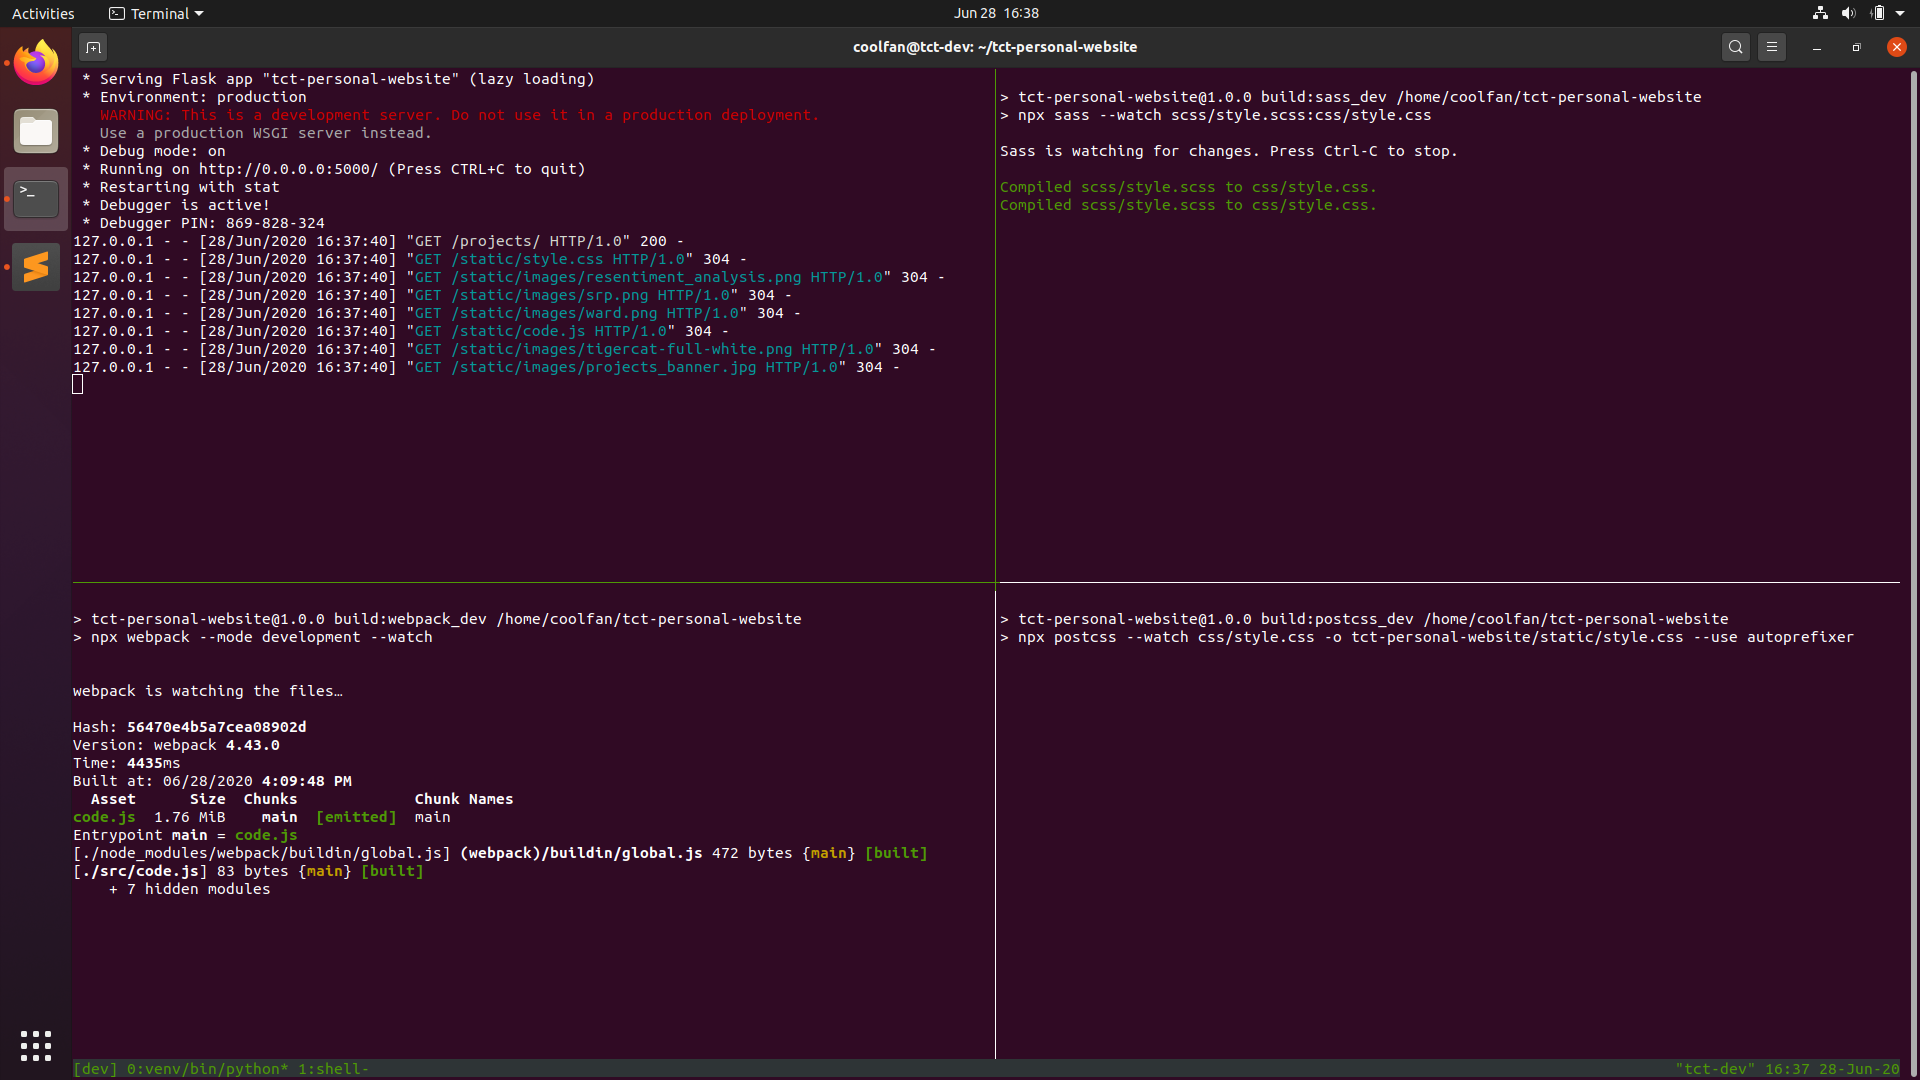
Development environments can often consist of many tools running simultaneously. There can be times where having to open and cycle through four or five terminal windows can get unwieldy. To solve this problem, one can use the terminal multiplexer tmux, which allows one to run many different shells and programs in the same terminal session. Typically, I create a shell script called dev_env in my project directory that, when invoked, sets up the tmux environment with all of my background compilation and monitoring tools running. The cover photo of this article shows an example of this, where I have a Flask development server running in the top-left corner, and several compilation tools on watch mode in the other three panes. I do most of my coding in Sublime Text (as you can probably also see), and whenever I need to check whether my code is compiling correctly, I would simply Alt-Tab over to the Terminal window and see everything all at once. I also have a separate tmux window (in the same Terminal) that has the local Python virtual environment loaded, and to access it I can simply press Ctrl-Shift-Right (this is a custom tmux key binding) to switch windows. Like pip, npm, and make, tmux is freely available and can be easily instally on most Unix-based computers via a single command (sudo apt-get install tmux on Ubuntu).
Closing Remarks
Regardless of how you choose to set up your development environments, remember to always take the time to do so early in the project in order to get the most out of them. At my university where I worked as a TA, I've helped many students on assignments that require a Makefile, and I've found that so many of them wait until the last minute before submitting their assignments to write their Makefiles, which completely defeats the purpose. Granted, for many of them, it was their first time learning about the wonders of make, and so it was an excusable offence, but for those of us with more experience programming, there ought to be no excuse not to set up our tooling properly.
I hope that you will find what I have written this article useful in your own projects. Good hunting!
— Yanjun Yang (@coolfan)